Install and initial configuration
Download the plug-in (a DLL file) and copy it in to the Winamp plug-in directory. On my system this is located at C:\Program Files\Winamp\Plugins. Then start/restart Winamp. When the plug-in is installed you will notice an additional item in the Winamp Media Library pane - labelled 'DAAP Servers'.
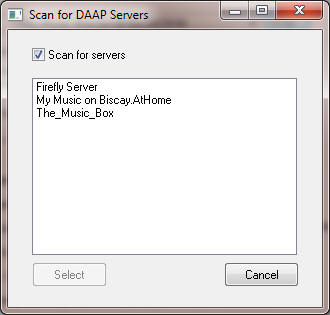
When run for the first time, the client has no information on which DAAP server(s)
are available on the network. So it will pop up a configuration dialog box.
![]()
Here you would normally switch between known servers, and change configuration options. But initially, the 'Active DAAP server' drop-down list is empty, so you must click the 'scan' button. Now, the network will be scanned for DAAP servers, and (if any are found) a list of available servers will be shown. Select with the server you wish to be the active server, then click 'Select'.
You will now return to the configuration dialog, and your selected server should be shown. If it is necessary to use a password to access the server, type the password in now. Other settings may be left as default for now - at this stage, concentrate on making contact with the server. (Note: under many circumstances it will not be necessary to modify the Host or port settings, however if this advanced configuration is required, see below).
Now click OK. The plug-in will attempt to connect to the DAAP server. With a fair wind, you should now see a server listed under the DAAP Servers Media Library item; click on this to open the plug-in graphical interface, and get on with using the plug-in.
Settings are stored in the Winamp.ini file. Any password is stored in an encrypted form.
Advanced configuration
For servers operating on the local network it should not be necessary to do anything other than to scan for servers and select the desired server, as described above. However, for certain situations (e.g. the server may operate across a VPN tunnel) it may be necessary to manually set the host or port. In this case, click on the 'Access port/host settings' check-box, and make the necessary changes. These are 'expert' settings (I don't know anything about VPN tunnels, perhaps you do!) The plug-in is reported to work (i.e. be able to access a server) through the Hamachi system with some manual configuration as described here.